How did you get here?
Once you’ve placed the code in your header as shown back on Creating an Adsense Account and Placing the Code, wait a few days for your account to be approved, for Google to scan your site, and start placing ads.
Auto ads is pretty cool in that it looks at how you’ve organized your site and tries to place the ads in places that get a good amount of traffic but also fits into the overall feel of the site. But one day you’ll notice an ad some place you simply don’t like. It might be before your featured image for a post or perhaps between your related posts lists where it bumps a related post out into the margin or onto the next line, totally screwing up your page format and driving that OCD tick into high gear. (Breath through it, it’s going to be ok, we’ve already fixed it for the Ghee Spot. This is just to help other bloggers know what to expect and how to handle it. )
What if you want to control where the ads go on your website?
There are two real options here:
- Modify where Auto Ads places the ads by declaring keep out zones.
- Manually place ad blocks on your pages and disabling Auto Ads.
Manual Ad Block Placement
No, this isn’t how to block ads, this is how to place the blocks that ads go in on your site manually (sorta, we’re still going to use the magic of automation but in a more controlled way). Oh, and what about option 1? Well I haven’t written that up yet since it requires me to activate auto ads on this site so that I can go through and show you how to create keep out zones. (AKA I’M BUSY AND I’LL GET TO IT LATER). So where was I?
Turn it off!
Ok so you’re going to place your ads manually. First we have to disable Auto Ads*. Log in to your Adsense account. In your Ad Settings Preview under Ad Settings simply click the Auto Ad button off.
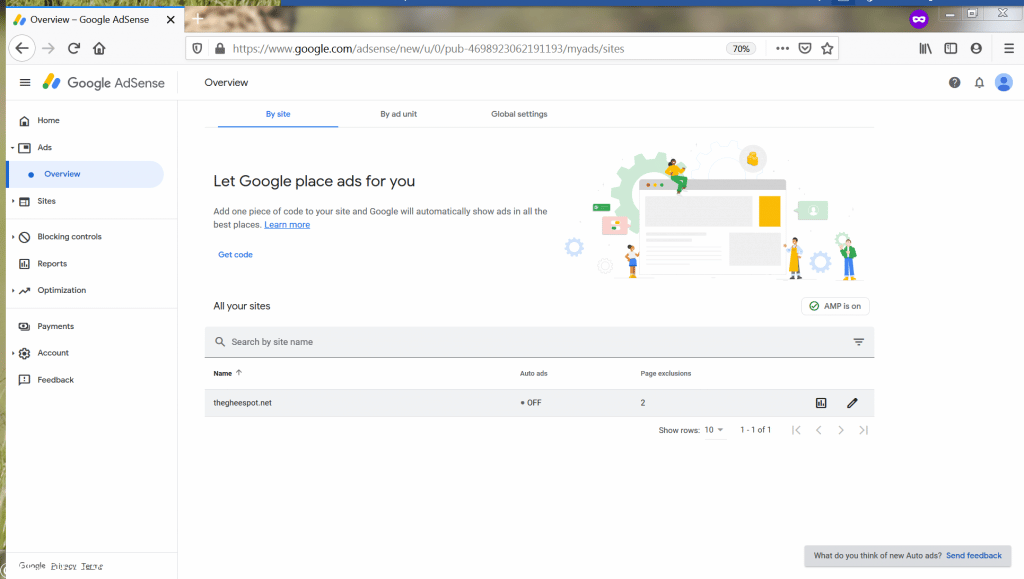
*it should be noted that you can have both auto ads and manually placed ads on the same page. However, if you’re going through the effort of manually placing ads it’s probably because you don’t trust google to place ads without messing things up soooooo probably worth just turning the feature off.
Create Ad Units
Next we need to create a few ad units. Ad units are basically where you define the shape and features of the ads that will be displayed on your site. The Types of ad units available to you will change over time so it’s worth just checking in every once in a while after you’ve got it all set up to see if you like something new.
That said, here’s the current ad units available:
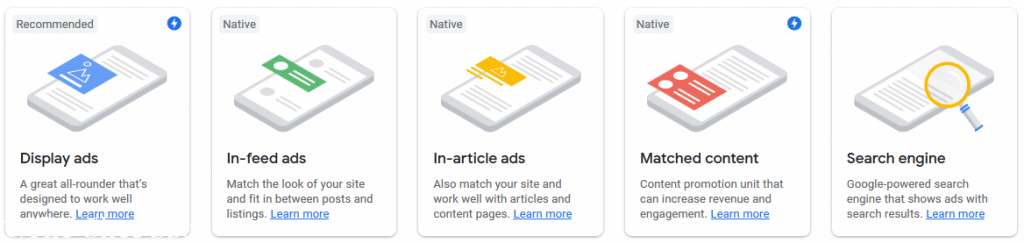
Display Ads
Google’s description is “A great all-rounder that’s designed to work well anywhere. “ I have to agree, they’re our most used ad unit and fit into the site very well. We use them for our sidebar, end of content, and footer ad units. The great thing about this ads is you can leave the size setting as “Responsive” and they’ll place ads that fit into the area available. This single setting works in both our sidebar (which uses vertical ads) and our footer (which uses horizontal or square ads. It also changes the shapes as appropriate when viewed on different screen sizes.
What does this all mean? It’s a good general ad unit.
In-Feed Ads
These ads are designed to fit between the posts and pages on your home page. We’ve got them placed between our posts on the front page and these generally have fit the feel of the page well.
In-Article Ads
These go in the actual posts, and more so, into the article or content in a much more integrated way that say a side bar ad. We’ve got these in a unit that we use to display an ad after the write up and before the recipe. Nothing too exciting but it works well without being super intrusive.
Matched Content Ads
This is a new one and one we’re not currently using. It takes your own pages and mixes them with other ads to give you a related content section. As I said, we don’t use it right now but it might be of interest if you’re looking for ways to show off other content within your site.
Search Engine
This is just what it sounds like, adding a search engine to your site that’s powered by google. This can bring some real search power to your site and help users find what they’re looking for but it also takes a bit more integration then some of these other ads. Some WordPress Themes support Google Search Engine integration and if you’re does you should follow your theme’s documentation to complete this.
Jesus man, TMI!
Ok, so that was a lot of information. Now what? Well we can start to think about how we want to display ads. First think about how many ads you want to have in general. We all know that the more ads we show, the more revenue we make, but we’ve also all seen those site that are just jam packed with ads and that makes us leave as soon as we can. Ads also tend to break up the flow of a website so if you’re really focused on a certain feel for your users you’ll want to slowly add more ads to your site and gauge it as you go.
Odds are you’ve got a couple main layouts being used on your site. Take a look through your site and just mentally note where you’d be ok with an ad being placed. Look for spots that have frequent visibility but are also unobtrusive for your users.
Also important to know, ads will slow down your user’s website experience. They take both bandwidth to load and force the user to load data from multiple servers (your server and google’s or wherever the ads are being hosted). We notice a significant change in page speed load times when we remove or adblock the ads during tests.
We’ll take The Ghee Spot for example. We’ve got the main page of the site which is the listing of all of our recent posts and related posts. We really want to drive people to the recipes and food without getting them distracted or annoyed by ads. So we’ve placed ads on the sidebar (which are globally displayed on our site) and on the footer (also globally displayed). This really places the ads around the main attraction which is our recipes.
We’ve also got (drum roll please) our recipe posts! These are our primary drivers for users coming to the site so we’d like to get a good balance here of ads and content. Again trying to not be annoying but also getting ads onto the user’s screens so we can get some income to balance out the cost of the website. We’ve got the ads on the sidebar and footer still but we also place some ads before and after the recipe block. We also play around with ads in the write ups on occasion but haven’t settled on a configuration yet.
Again, WHAT NOW?
Ok so let’s just list the areas we’re going to place ads (with The Ghee Spot as an example):
- Side Bar
- Footer
- Before recipe
- After content (really after recipe)
Now that I have a list of places I want to put the ads I can make some ad units. (Whew, back to the google adsense that we started to look at before I dumped all this on you.)
1. Side Bar (who doesn’t need another bar?)
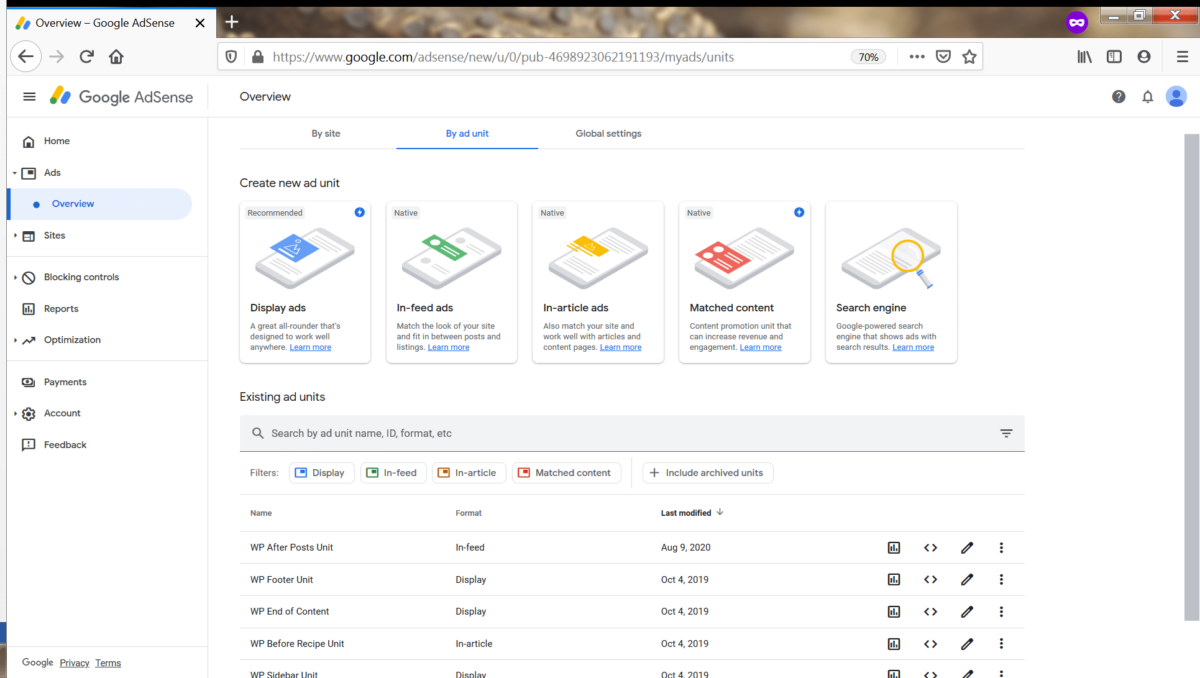
Go ahead and click on the Ads section on your left hand bar. Then Click on “By Ad unit” to get back to your list of possible ad units we were talking about. Let’s start off easy, we want a side bar ad unit and since it’s not an “In-feed” or “In-article” ad we’re going to go with “Display ads”.
- Under Create ad unit, click on the Display ads. Here you’ll get a preview of what the ads might look like. It’s really just so you can see the general shape and or colors of the ads.
- Name the ad unit in the upper left corner of the screen. I’d suggest something very original like Side Bar Ad Unit.
- Leave the ad size as responsive. Why leave it responsive if we know we want vertical ads when people look at the site on a computer? Because we want the ads to adapt in shape or size if someone visits with a phone or tablet. Most themes now will adjust placement of the side bars and other elements of your website and you want these ads to adapt as well. Plus it’s just easier so why make life hard?
- Click Create. Bam! Ad Unit ready! Sorta…
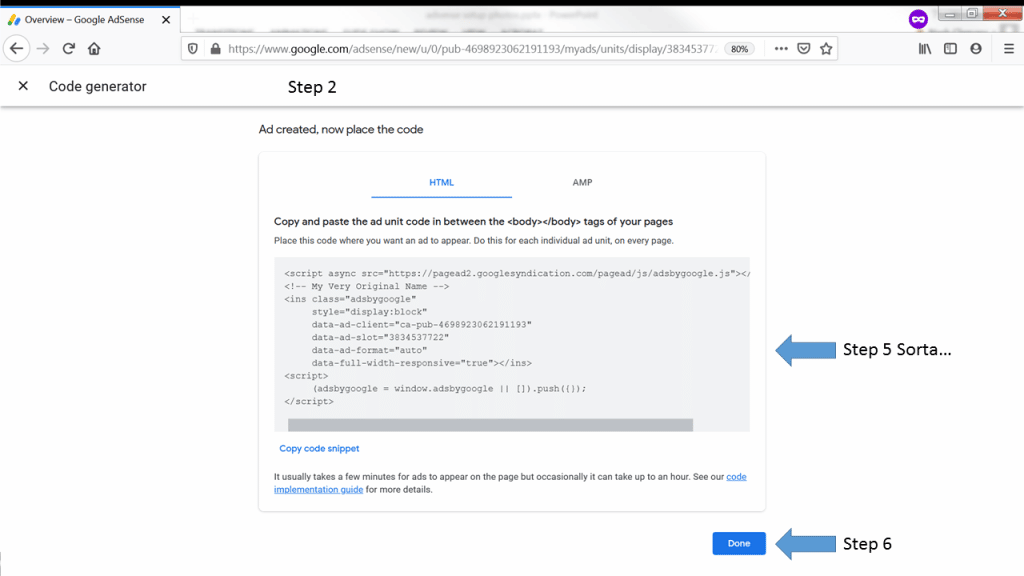
- Ok so now you’ve got this code to copy and paste. You could do that now and then come back and make more ad units. Me? I’m lazy and prefer to get all my stupid little steps done here first.
- So click on Done and tell google you’ll do what you want and not what they tell you to do!
2. Footer Ad (aka Wash and Repeat)
Go ahead and repeat those steps for the footer ad unit, except try to name it something other than side bar ad unit since you probably named your first ad unit that.
3. Before Recipe (and now a quick word from our sponsors)
Now here’s where things get “crazy” we’re going to make a new ad unit that’s not a Display ad! Easy Sherlie, it’ll be ok. Of course if you really want to you can make the Before Recipe ad unit a display ad but I prefer to use the in article ad unit. So click on In-article Ad under create new ads. Oh no a new page!
Way different screen, yikes! Ok take a deep breath.
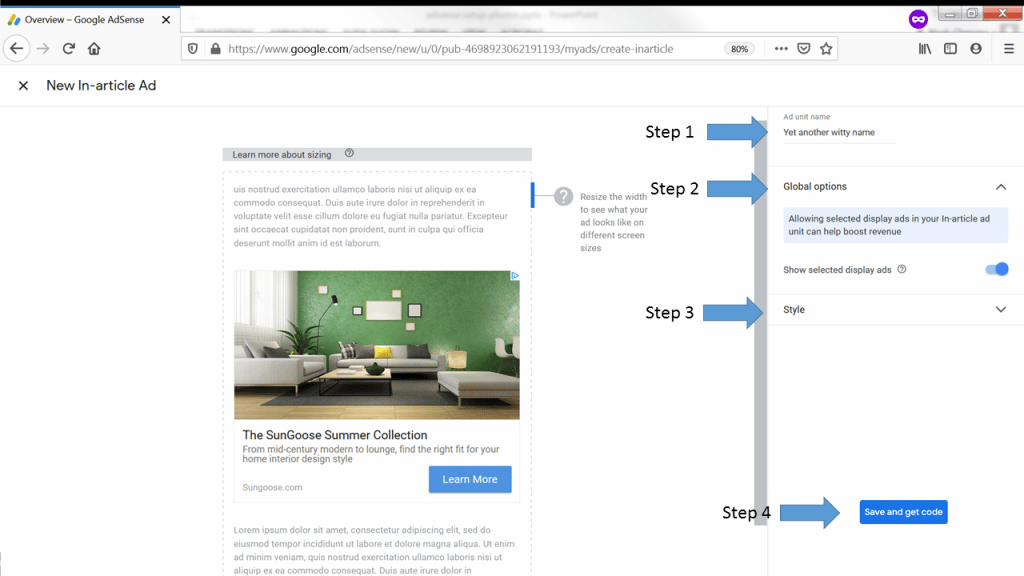
- Name the ad unit in the right side of the screen. Yes yes, I know, we use to name ad units on the left side of the screen. You must remember though, that was the Display Ads way of doing things. We ain’t got no time for that here!
- Here’s where we get to start playing with settings. Under Global options we can allow google to also place Display ads if they feel it’s a good fit instead of In-article ads. Yay Display Ads are back! Actually this just gives google more options for ads to display which really means you’re getting higher paying ads.
- Under Style you can adjust the font used in the ad as well as the font colors and backgrounds to make sure they match your site’s feel. You can also let google help optimize the styles and they’ll use your setting generally but might switch things up sometimes if they have a reason (or just feel like it). Either way, feel free to play with these settings and the demo ad on the page.
- Once you’d done playing with yours, er, you ads, click Save and get code.
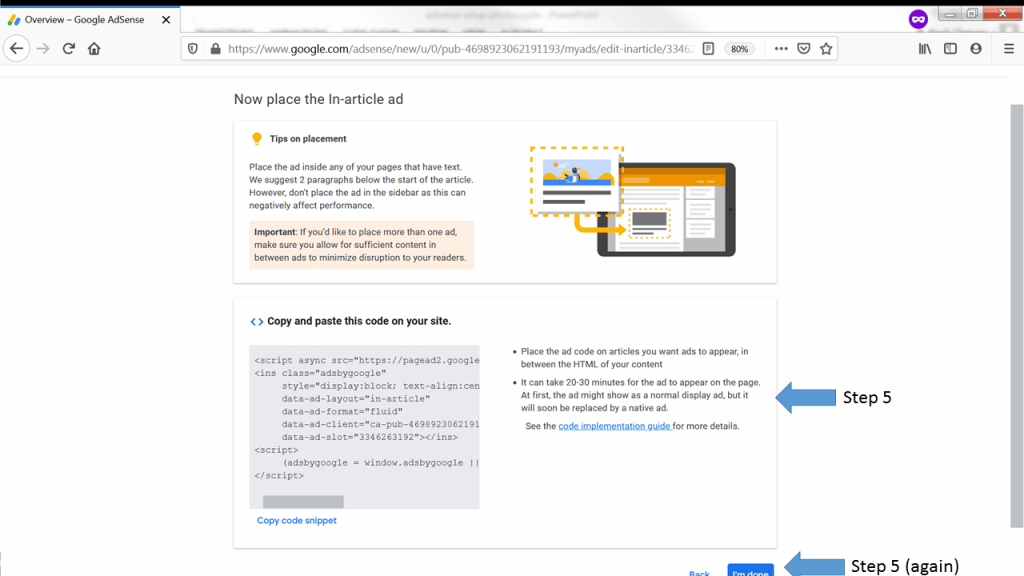
- Same situation here as the previous ad units, you can copy the code and stick it into your website now or just wait until you have all your ad units done. Click I’m done and get out of here.
4. After content (Make it stop!)
Lastly is the After Content Ad. Guess what? It’s a display ad so you should be able to handle this one all by yourself.
How does this get on my website?!
Ok so now we have ad units ready to go from google. How do we actually place them on our site? Well, as with all things WordPress, we can either hand code everything or install a plug in. I’ll wait here, you think about it for a minute.
Plug in it is!

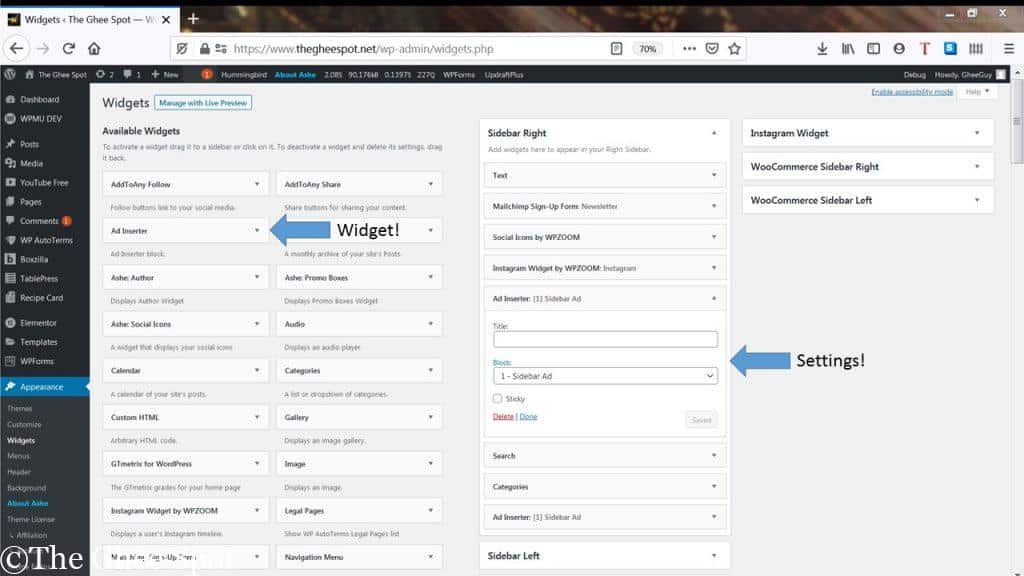
Ad inserter to the rescue! I’m a little old school when It comes to certain things so ad inserter does it for me. They’ve got a simple interface and lets you copy in all that code google gave you and then let’s you place it either through short codes, widgets, or code injection. So first things first, download Ad Inserter from the WordPress library on your site. Don’t want to? Fine, don’t, but I won’t help you anymore!
Ok once it’s installed and activated, go to your settings in your dashboard and you’ll see Ad Inserter there now as well. Click on it and you’ll get a blank box and a bunch of things you can click. The way Ad Inserter organizes things is by ad unit. So this will start to make sense pretty quick.
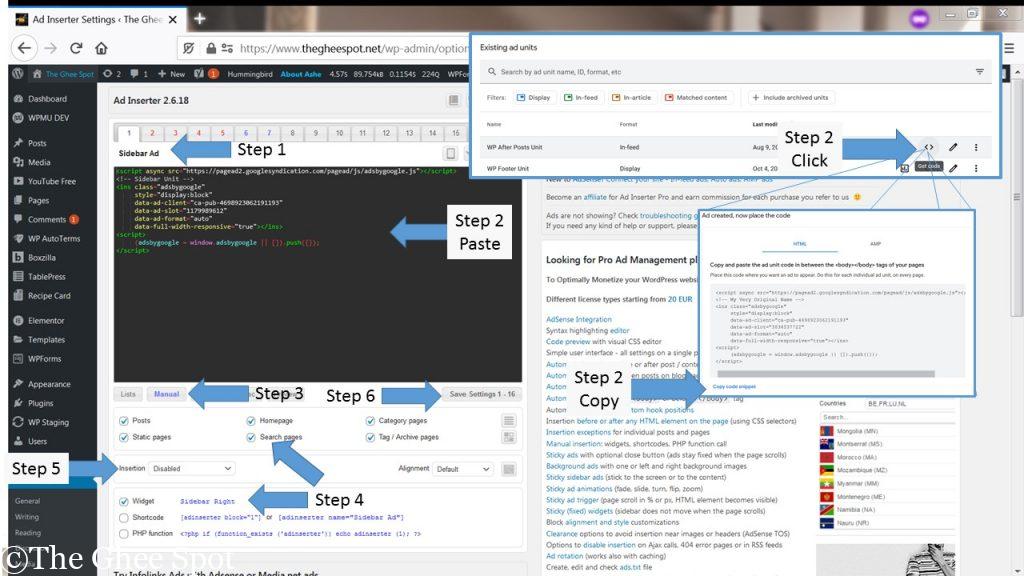
- First, click where it says Block 1 and type in your first ad unit’s name (aka Side Bar Unit). Do you have to use the same name as the ad unit in google? No, but why confuse yourself?
- Once you’ve named the block go back to your google adsense page and select the get code button on your ad unit, copy this code into your block on Ad inserter.
- This ad you’ll want to insert by using widgets since it’s going on to your side bar (which is probably all widgets). Click the “Manual” button under the code box so that you get three check boxes for “Widget” “Shortcode” and “PHP function”.
- Go ahead and check the Widget box. Also check off all the different types of pages you want this to function on (Posts, Homepage, Category, etc”)
- Double check and make sure the “Insertion” option is set to Disabled.
- Click Save Settings 1-16. This will save all the changes you just made.
Now since we made this a widget type ad we need to load up your theme’s editor and go add the widget to your side bar where ever you’d like it to be. It should show up as just another widget available to you. Make sure to select the correct Block in the widget setting. (Block 1 remember? You named it Side Bar Unit. Sigh.)
Here comes the money!
Once you’ve done that you ad is setup! Wooo! Pop the champagne! Quick, load up the page on a private browser or how ever you like to view your site. Let’s look for that fancy new add…………..where is it? Crap, did something break? Did you not copy the code right? Is ad inserter working? WTF IS HAPPENEING!?!?!?! Ok so here’s the frustrating part of all this, it’s going to take some time for google to scan your site, check that your legit, check how ads would fit into it all and then find people who want to advertise on your site. So it’s going to take a few hours to a few days. Sorry for getting you all excited. But you know what that means? We now have time to place the rest of the ads! YAY!
Well if you don’t have anything else to do…
Go back to your ad inserter page and click on the number 2, rename this one just like you did in the previous set up. Oh and yes, feel free to drink that champagne you opened. No use letting it go to waste.
So this one will be similar to the last ad unit. I’m assuming you’re following the same order of units as we setup before so this is the footer unit.
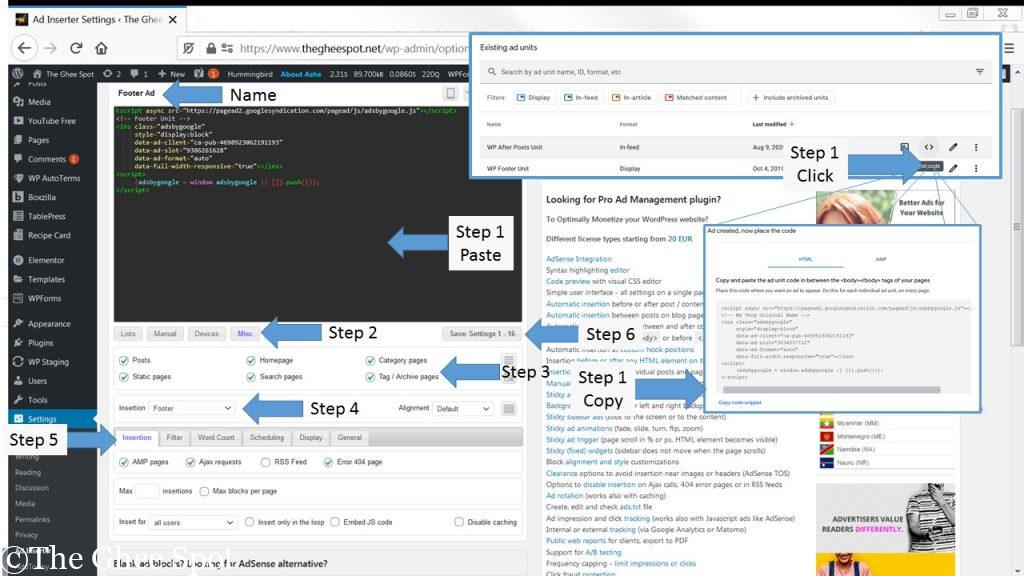
- Copy the code from google.
- Click on Misc here instead of Manual.
- Make sure all your pages, posts, and homepage are selected in the box below the code box.
- With the “Insertion” drop down menu, select Footer. Adjust the alignment if you want or leave it as default.
- Then on the Insertion tab (not to be confused with the drop down menu) click AMP Pages, Ajax Requests and Error 404 pages. (Why let an error get in the way of money?) This all will insert the ad unit into every page as part of the generation of the page within your server. What this really means is you don’t have to add this as a widget to the footer or manually copy code to the footer of your pages. Obviously you can if you wish but I’m not going to help you there either.
- Save your settings again.
Bam, that code is live and you’ve got google ads on every page’s footer. You know, when google gets around to putting ads on your site.
Soon.
Real soon.
More ways to make that sweet money
The After Content ad unit is basically the same as the Footer. When selecting the “Insertion” drop down menu click on After Content. This places the ad after all the typing and blocks and other things you add to each post. It will place it before some auto generated parts of the post such as the tags list.
Too Easy!
Ok those two methods (widgets and insertions) are probably what you’ll end up using the most but there’s a third method of placing ads that’s also very useful. Why learn this other method? Why not? We’ve got some time before Google gets around to showing ads, so let’s take a look at it.
Did you notice we missed on of our four ad units we created? Yeah that one, Before Recipe. Fear not!
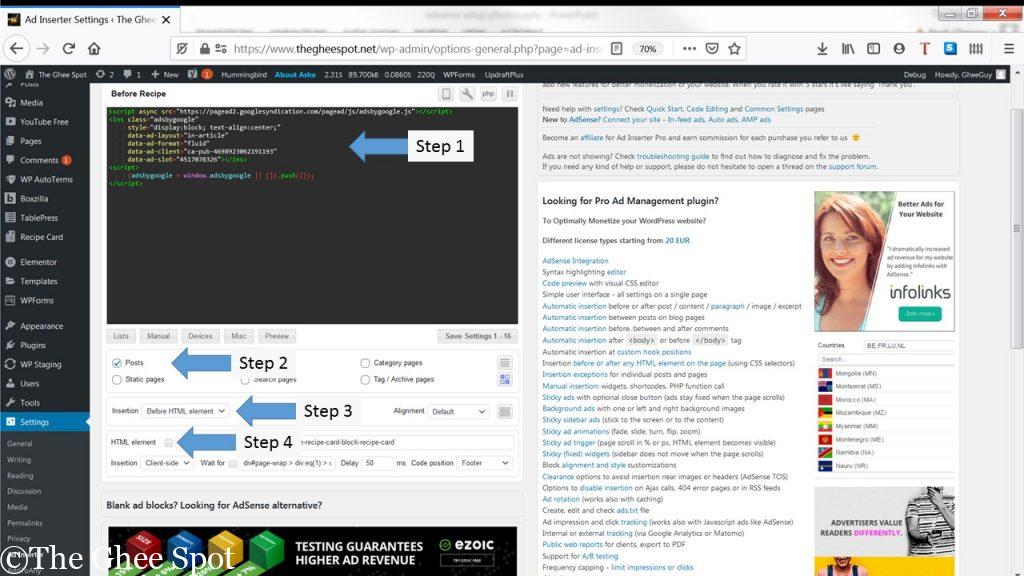
- Grab one of the empty add blocks in Ad Inserter and copy your code over from google.
- Now here instead of clicking on every type of page you have you can click on just Posts since you probably only have recipes on posts. This will help reduce the processing your server does since it won’t check your search pages for recipes to place the ads before.
- Under Insertion drop down, select Before HTML element.
- You’ll get a new little box underneath the insertion drop down menu now that has a line titled HTML Element. Click that Check box. HAHAHA fooled you! It wasn’t a check box, it was a launch button! Ok fine, no more tricks.
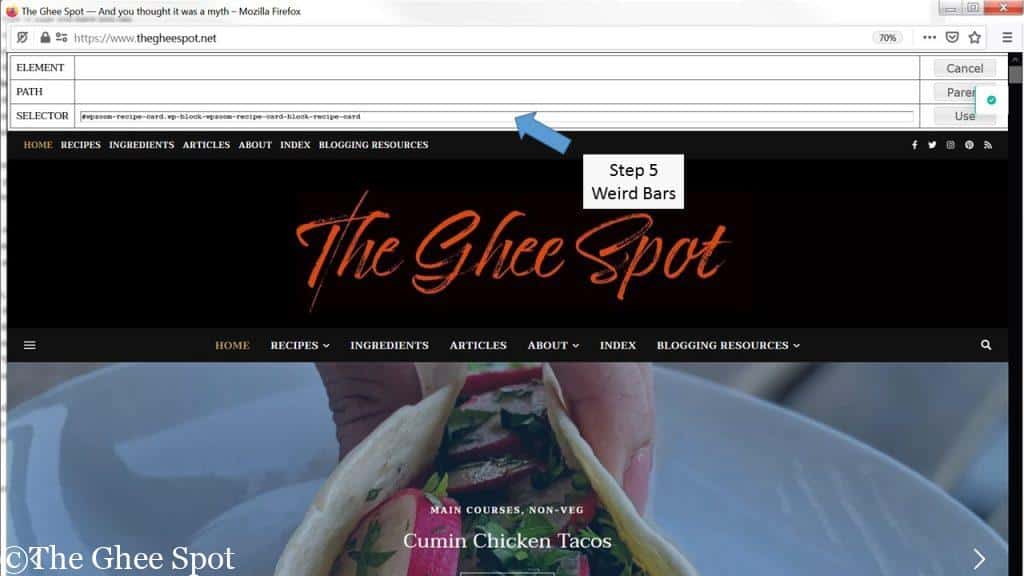
- So now you have your site pulled up and you have some weird bars on top, go ahead and click on one of your posts. It’ll work and look funny but that’s life.
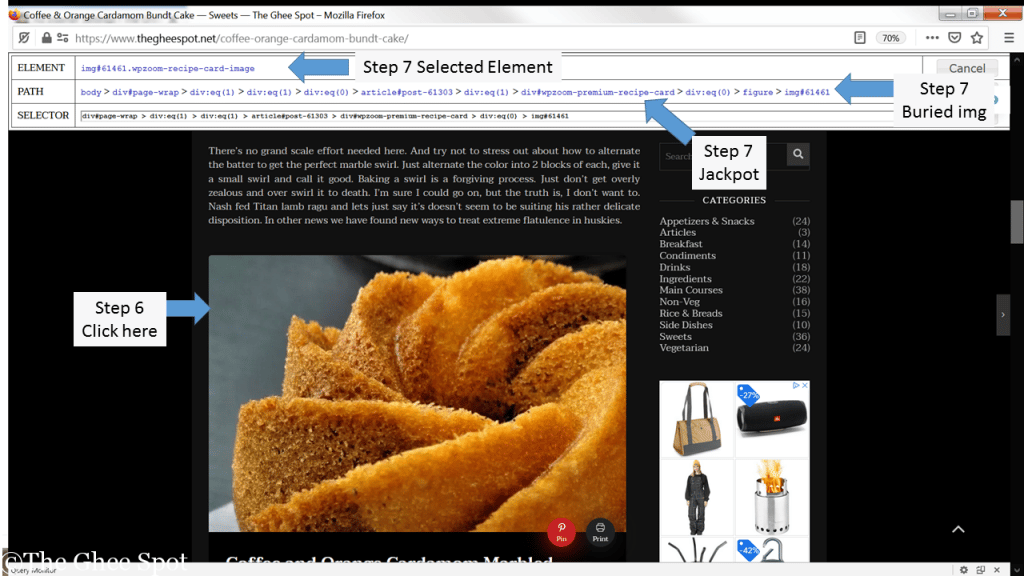
- Once your post has loaded you can now click on the top portion of your recipe card.
- Notice that at the top of the window is something labeled “ELEMENT” what you’re looking for is something used by your recipe card plug in to identity itself. Take a look at that path and you’ll see how the image is buried under all these other sections. “Body to DIV#page-wrap blah blah blah”, oooh, here’s one we can use, “div#wpzoom-premium-recipe-card”.
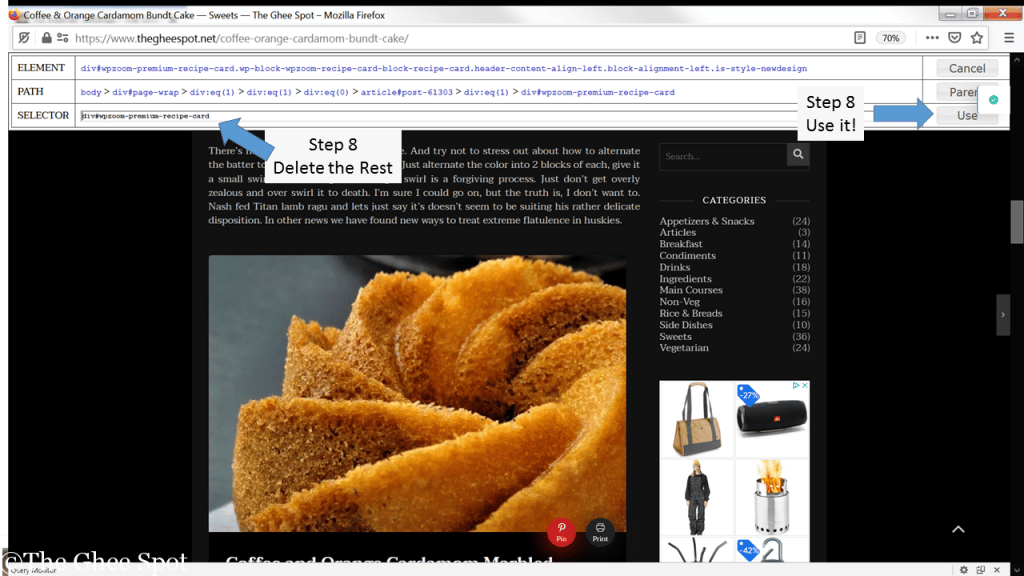
- This is the HTML element that starts to define our recipe card and we want to place the ad right before this. in the SELECTOR FIELD, highlight and delete the portion after the element we want. Now, go delete the portion before. You should see it fill in under “ELEMENT” once that’s done click on “Use”.
- Now go ahead and save again. Don’t want that effort all wasted.
Ok now if this works you’ll start getting ads before the recipe card. The nice thing here is you don’t have to remember to add the ads manually when you’re creating your posts, ad inserter will add them for you.
Success!
Now sit back, let google get around to placing your ads and let the money roll in! You know, when they finally show up.
Soon.
Real soon.